Building an affordable, mobile chicken coop doesn’t have to break the bank or take weeks to complete.
A hoop coop made with cattle panels offers the perfect solution for homesteaders and backyard chicken keepers who want a sturdy, easy-to-build structure that can house their growing flock.
In this comprehensive guide, we’ll walk you through building a 12-foot-long hoop coop that can be completed in just one day.
What Is a Hoop Coop?
A hoop coop is a portable chicken shelter built using cattle panels bent into an arch shape to create the main structure. This design combines the benefits of a traditional chicken coop with the mobility of a chicken tractor, allowing your birds access to fresh grass and bugs while staying protected from predators.
The cattle panel hoop house design has become increasingly popular among homesteaders because it’s cost-effective, requires minimal carpentry skills, and provides excellent ventilation for your flock.
Why Choose a Cattle Panel Hoop Coop?
Cost-Effective Construction
With materials costing around $200-300, this DIY chicken coop is significantly cheaper than pre-built coops. The primary investment goes into cattle panels, pressure-treated lumber, and chicken wire—all readily available at farm supply stores.
Quick Build Time
This project can be completed in 5-6 hours of active work time, making it perfect for a weekend project. Even with weather interruptions, you can have your chickens in their new home within a day or two.
Exceptional Strength and Stability
Despite its simple design, a properly built hoop coop is remarkably sturdy. The arched cattle panels create natural structural integrity, and the diagonal bracing adds extra support to withstand wind and weather.
Easy Maintenance
The open-bottom design allows chickens to fertilize your pasture naturally while giving them access to fresh forage. Many chicken keepers add wheels to make the coop truly mobile, rotating it to new grass every few days.
Materials List for a 12-Foot Hoop Coop
Lumber (Pressure-Treated Recommended)
- (4) 2x4x8′ pressure-treated boards for base
- (2) 2x4x7′ pressure-treated boards for width
- (6-8) 2x4x8′ standard boards for framing front/back walls
- (2) 2×4 pieces for diagonal bracing
Cattle Panels and Hardware
- (3) 16’x50″ cattle panels (also called livestock panels or feedlot panels)
- (1) Roll of chicken wire or hardware cloth (hardware cloth preferred for predator protection)
- Heavy-duty vinyl tarp or billboard material (for weather protection)
- Box of galvanized deck screws (5″ recommended)
- Galvanized pipe hanger straps (roll)
- Fencing staples
- Zip ties or cable ties
- Gate hinges (recycled or new)
- Door latch
Tools Required
- Circular saw or miter saw
- Power drill with screwdriver bits
- Bolt cutters or angle grinder (for cutting cattle panels)
- Staple gun
- Level
- Measuring tape
- Pencil
- Wire cutters
- Safety glasses and work gloves
Step-by-Step Build Process
Step 1: Build the Base Frame
Start by cutting your pressure-treated 2x4s to create a 7-foot by 12-foot rectangular base. Use the 8-foot boards for the length (you’ll have two 12-foot sides when joined) and cut two boards to exactly 7 feet for the width.
Pro Tip: Pressure-treated lumber is essential for the base since it will be in contact with the ground. This prevents rot and extends the life of your coop significantly.
Assemble the rectangle using 5-inch deck screws, driving at least two screws into each corner connection. Make sure to check that your frame is square by measuring diagonally from corner to corner—both measurements should be identical.
Step 2: Prepare and Attach Cattle Panels
Lay your first two 16-foot cattle panels flat on the ground side by side. These panels will form the hoops that create your coop’s distinctive arched shape.
Position your base frame next to where you want the coop located. Attach the first cattle panel to one of the 12-foot sides by placing the panel edge along the outer edge of the 2×4 and securing it with pipe hanger straps. Use 3-4 straps per panel, spacing them evenly along the length.
Important: The cattle panels should be attached to the inside of your frame, not the outside. This puts the stress of the bent panel against the wood rather than pulling against the staples or straps.
Carefully bend the cattle panel up and over to create the arch. You’ll need at least one helper for this step. Secure the opposite end to the other 12-foot side of your base frame. The natural arc should create approximately 6 feet of interior height.
Repeat this process with the second cattle panel, positioning it next to the first. Use zip ties to connect the two panels together along their length for added stability.
Step 3: Cut and Install the Back Panel
Measure the opening at one end of your hoop structure. You’ll need to cut down the third cattle panel to fit this space. Typically, cutting off 6 inches (one row of wire squares) works perfectly for a 7-foot-wide base.
Use bolt cutters or an angle grinder to carefully cut the cattle panel. Attach this shortened panel to close off the back of the coop, securing it to both the base frame and the arched panels with zip ties and pipe straps.
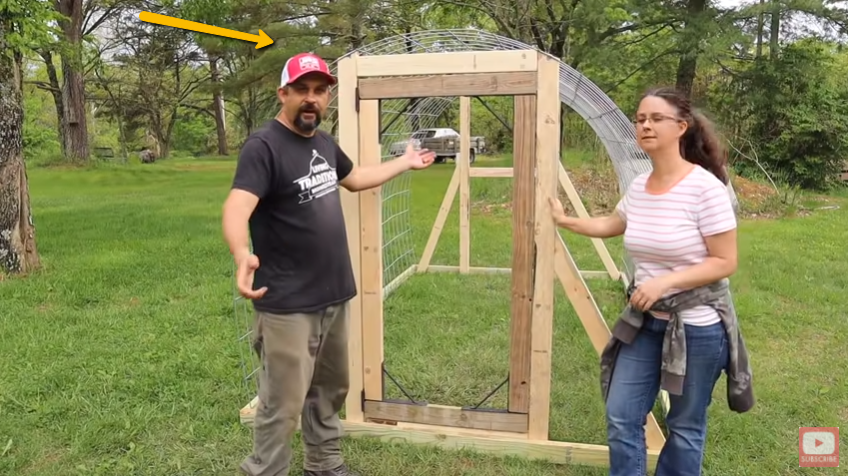
Step 4: Frame the Front and Back Walls
Now comes the crucial step of adding wooden framing to both ends of your hoop coop. This provides structure, stability, and a place to hang your door.
For the Front (Door End):
- Cut two 2x4s to fit vertically from the base to the top of the cattle panel arch. Trace the curve of the panel onto the board and cut at that angle.
- Position these uprights where you want the door opening (typically 24-30 inches wide).
- Attach the uprights to the base frame and secure them to the cattle panels using pipe hanger straps at multiple points.
- Cut diagonal braces to run from the base corner to the top of each upright, creating a triangle. This dramatically increases stability.
- Add a horizontal cross-brace between the two uprights if desired.
For the Back Wall:
Repeat the same process, but you can place a vertical 2×4 in the center and/or add horizontal bracing since there’s no door needed. This gives you attachment points for the chicken wire and adds extra strength.
Game-Changing Tip: The diagonal bracing makes an enormous difference in structural integrity. Don’t skip this step—it transforms the coop from wobbly to rock-solid.
Step 5: Build and Hang the Door
If you have recycled gate hinges with built-in bracing (like those from an old gate), you’re ahead of the game. Otherwise, build a simple door frame:
- Cut two vertical 2×4 pieces to your desired door height (usually 5-6 feet)
- Cut two horizontal pieces for top and bottom
- Add a diagonal brace across the door for strength
- Assemble with deck screws
Attach heavy-duty hinges to one of your vertical uprights, then hang the door. Add a secure latch that can be locked to keep predators out at night.
Step 6: Cover with Chicken Wire
Unroll chicken wire or hardware cloth over the entire structure. Start at the back and work toward the front, stapling the wire to the wooden frame members every 4-6 inches.
Predator Protection Note: Hardware cloth (1/2″ or 1/4″ welded wire mesh) is superior to chicken wire for keeping out predators like raccoons, weasels, and snakes. It costs more but provides significantly better protection.
Cover the door with chicken wire as well, pulling it tight and stapling securely around the entire frame.
Use additional zip ties to attach the chicken wire to the cattle panels throughout the structure. This prevents sagging and eliminates gaps where predators might enter.
Step 7: Add Weather Protection
Cover approximately half to two-thirds of the hoop with a heavy-duty tarp, billboard material, or corrugated roofing. This provides shelter from rain, sun, and wind while maintaining airflow.
Secure the covering by:
- Draping it over the highest point of the arch
- Pulling it tight and stapling it to the front and back wooden frames
- Using additional straps or bungee cords to secure it to the cattle panels if needed
Billboard vinyl is an excellent material because it’s extremely durable, often free or very cheap from advertising companies, and lasts for years.
Step 8: Interior Setup
Add essential interior features to make your chickens comfortable:
Roosting Bars: Install branches or 2x4s (placed with the 4″ side up) horizontally inside the coop at varying heights. Chickens prefer to roost 2-4 feet off the ground.
Nesting Boxes: You can build simple nesting boxes from scrap wood or use plastic totes. Place them in a sheltered area away from the main traffic flow. Plan for one nesting box per 3-4 hens.
Waterer and Feeder: Hang these from the cattle panels to keep them off the ground and reduce waste and contamination.
Modifications and Upgrades
Adding Wheels for True Mobility
Attach heavy-duty wheels to one end of the base frame to create a true chicken tractor. This allows one person to easily move the coop to fresh pasture daily or weekly.
Increasing Size
Need more space? Simply add another cattle panel to create a 16-foot or 20-foot-long coop. The beauty of this design is its scalability.
Climate Adaptations
- Cold climates: Add removable insulation panels or additional tarps for winter protection
- Hot climates: Ensure adequate ventilation and shade by leaving more of the structure uncovered
- Windy areas: Add extra diagonal bracing and secure tarps more thoroughly
Predator Protection Enhancements
- Bury hardware cloth 12 inches underground around the perimeter to prevent digging predators
- Add an automatic door that closes at dusk
- Install motion-activated lights or alarms
Capacity and Flock Size
This 12-foot-long hoop coop (approximately 84 square feet) comfortably houses:
- 15-20 laying hens if they have daytime access to free-range or a larger run
- 10-15 laying hens if this is their only living space
- 50-75 meat chickens (broilers) that will be processed before reaching full size
The general rule is 3-4 square feet per bird inside the coop, with 8-10 square feet per bird in outdoor run space.
Cost Breakdown
Based on current material prices, here’s what you can expect to spend:
- Cattle panels (3): $60-90
- Pressure-treated lumber: $60-80
- Standard 2x4s: $40-50
- Hardware cloth or chicken wire: $50-80
- Screws, staples, hardware: $30-40
- Tarp/covering: $20-50
- Hinges and latch: $15-25
Total estimated cost: $275-415
Compare this to pre-built coops of similar size that typically range from $800-2,000, and the savings become clear.
Common Mistakes to Avoid
Not Using Pressure-Treated Wood for the Base
Standard lumber will rot quickly when in contact with soil and moisture. Spend the extra money on pressure-treated boards for any wood touching the ground.
Skipping the Diagonal Bracing
Many first-time builders underestimate how much the diagonal braces strengthen the structure. Without them, the coop can feel unstable and may not withstand strong winds.
Inadequate Predator Protection
Chicken wire keeps chickens in but doesn’t keep determined predators out. Hardware cloth is worth the investment, especially for the lower 3 feet of the structure.
Poor Ventilation
While weather protection is important, chickens need excellent airflow to prevent respiratory issues. Don’t cover the entire structure with solid tarps—leave the ends and peak areas open.
Not Securing the Cattle Panels Thoroughly
Use plenty of attachment points. The cattle panels are under constant tension from being bent, and inadequate fastening can allow them to pull free over time.
Maintenance and Longevity
With proper construction and basic maintenance, your cattle panel hoop coop should last 10-15 years or more. Regular maintenance includes:
- Monthly: Check all fasteners and tighten any that have loosened
- Seasonally: Inspect tarps and covering materials for tears or UV damage
- Annually: Reapply stain or sealant to exposed wood surfaces
- As needed: Replace worn chicken wire or hardware cloth
The mobility of this design actually reduces maintenance since you’re not cleaning out accumulated manure—you simply move the coop to fresh ground.
Final Thoughts
Building a hoop coop with cattle panels is one of the most practical and economical ways to house backyard chickens. The combination of low cost, quick build time, and proven durability makes it an ideal choice for both beginners and experienced homesteaders.
This design has been tested by thousands of chicken keepers worldwide and consistently receives high marks for functionality and ease of construction. The flexible nature of the design means you can adapt it to your specific needs, available materials, and flock size.
Whether you’re starting your first small flock or expanding your existing chicken operation, a cattle panel hoop coop provides a reliable, cost-effective housing solution that will serve your birds well for years to come. The best part? You can build it in a single weekend and have your chickens moved in by Sunday evening.
Ready to get started? Gather your materials, recruit a helper for the cattle panel bending, and you’ll be amazed at how quickly this practical coop comes together. Your chickens will thank you with fresh eggs and the satisfaction of knowing you built their home with your own hands.
Check out the video to learn how.
Here is part 2:
Next if you want to Discover How to Easily Build an Attractive and Affordable Chicken Coop with Detailed Plans Click Here
If you like woodworking and want to build more projects like this then get your hands on over 16,000 woodworking plans here <<<